|
Oh, behave! I'm talking about this idea floating around the ether that if you get your wood wet you'll destroy it. Sometimes you need to get it a little wet to see what it's capable of! Is your brain still going where I think it is? That's by design. I really need this blog to get more readers. Cha-ching, ye olde pervs.
Have you ever seen an awesome old piece of furniture and thought, 'If they just took better care of it, it would be perfect'? Sometimes what an old piece needs is a thorough cleaning. I've read a handful of tutorials, tried a bunch of different things, and I find what works best are these steps: We are a participant in the Amazon Services LLC Associates Program, an affiliate advertising program designed to provide a means for us to earn fees by linking to Amazon.com and affiliated sites. 1. Assess the damage: a little mineral spirits rubbed into the wood will give you a clear picture of how far gone the wood is. If wetting the wood with mineral spirits reveals its beauty, it really just needs a thorough cleaning and some new clear coat. If the mineral spirits doesn't make any sort of a difference in the way the wood appears, you'll need a different and more time consuming approach. 2. Get it wet: No matter what I plan to do with a piece I always clean it. I prepare a bowl of water, a bowl of water/ dish soap, and have a sponge and a toothbrush handy. I lather up sections of the piece at a time with the soapy mixture, and then rinse with the water mixture as I go. You don't want to drench the furniture, nor do you want to leave soap scum or scrubbed off residue on your piece for any length of time. The toothbrush will help clean out any detailed areas of your piece. 3. Determine what's next: (1) If a piece looks too far gone for a simple rejuvenation, I strip it and start fresh; (2) If it looks like it cleaned up well, and just needs a little love, I go straight for the Howard's Restore-A-Finish, and Feed-n-Wax. I've had great luck with the Howard's restoration line. 4A. Howard's Process: Once your piece has had time to dry from the thorough cleaning you've given it, and you've decided you can either live with a few minor scratches or there aren't any, you can apply Howard's Restore-A-Finish. Always match up the Howard's to the piece's existing finish, and choose a color a shade lighter. I chose a color I believed matched perfectly for my first time around, and any parts where there wasn't any stain left appeared darker than the original. It wasn't very noticeable to the naked eye, but with practice I've learned that a lighter shade blends much better. It's messy, so applying it requires gloves or filthy fingernails. Its application requires a fine steel wool (0000). You just apply the Howard's to the steel wool, and rub in the direction of the grain. I let it sit for a few minutes, and then wipe it off (in the direction of the grain). These are some photos before and after an application of Howard's:
Once you've wiped the Howard's off completely (like stain, you want to remove it all) you can apply the Feed-N-Wax to seal your piece. I let it sit for quite a while before I wipe it off. It does a nice job conditioning the wood.
4B: Howard's cant help me: If the piece is too far gone for a simple clean up, you'll need to figure out what steps to take. Most antique pieces will look great cleaned up; afterall, the 'character' scratches, dents, and gouges are what make it so special. Once it's cleaned they look like they were intentional, like the jeans our grandparents make fun of us for wearing because we paid extra for the holes. There are plenty of products out there to fill holes (like Kwikwood: a fast acting epoxy that I've used many times), and fill cracks (Home Depot and Lowes sell lots of them, it's the application that's most important). There are also many techniques to cover up the restoration work you've done (like painting stain on epoxy with a craft brush). If retaining the integrity of the original piece is not on your list of priorities, you can always start fresh. Citristrip is a mild stripper that will remove paint, varnish, stain, etc. but won't send you to the ER with a bloody nose and half of your skin melting off (hehe). If you want to start fresh, and you're not worried about devaluing an antique piece, get r' done. Strip that sucker and then evaluate whether you want to do any major repairing, or just camouflage the damage with a new look. Most pieces from the last thirty years can have a lot of added aesthetic value when re-stained, whereas a piece from the 1800s or early 1900s shouldn't be changed too much. Nothing hurts my eye balls more than a painted tiger oak dresser. The moral of the story here, kiddos, is that 276 layers of gunk will make a piece look really sh**ty. Clean it before you write it off, and for heavens sake: get it wet. Here are some pictures of a cool set I used the above process on! You can see, in one picture, that half of the chair has been cleaned and the other half has caked- on black gunk from decades of neglect. The chairs originally appeared to have a dark stain, but once thoroughly cleaned they were much lighter, and richer. Enjoy, and thanks for reading. ; )
2 Comments
Sounds too good to be true? Well, it is if you don't feel like getting your hands dirty. Dirty I am, and not because I shopped in dumpsters.
When we first moved to Oldsmar we did so without much furniture. Most of it was being held hostage by con-artist movers, so I started shopping around for some temporary stuff (on the off chance we'd get ours back, which we didn't). What I found at the local furniture stores was over-priced garbage, and most of the stuff on craigslist came with a side of rape and murder. I started perusing the app Letgo and local thrift stores, and couldn't believe how many gems were being discarded. I furnished our entire house with other people's rubbish for under $1,000. I realize $1,000 is not free, but keep reading. It gets free...er. This was no easy task, mind you: I had to source all of the products I wanted, rent a u-haul van, drive all over the greater Tampa area to pick the pieces up, unload them into our home, and then refinish all of them. I worked non-stop for a few weeks until the house was finally furnished. Here are some pictures of the pieces I did for our home:
I was so tired, so crabby, and so angry about my things being stolen that I didn't even realize the opportunity it afforded me: I had found my passion accidentally, and could make money doing it.
I re-listed most of the furniture on Letgo and sold all of it quickly. A few of the pieces led me to some wonderful people, who were brave enough to entrust me with furniture makeovers for their homes. SHOUT OUTTTTSSSSSSS, cus you know who you issSSsssss! As I was selling the things in my home, I was replacing them with more quality pieces. So, if I sold a dresser for $200, I'd make sure the next one I bought cost about the same (after supplies for refinishing). I was able to find some really incredible pieces for my dining room, including a solid oak Bernhardt china cabinet from the '60s, four solid wood dining chairs from Ethan Allen and four from a Maine based furniture company (they're mixed-matched but you can't tell), and a 9ft long dining table that was originally a commissioned project. I've repeated this process throughout my home, and probably will continue to until my eclectic sense of style and hoarder tendencies are satiated. I JUST LOVE FURNITURE!!! We are a participant in the Amazon Services LLC Associates Program, an affiliate advertising program designed to provide a means for us to earn fees by linking to Amazon.com and affiliated sites. The Process: The mixed-matched chairs were given a matching makeover, in a super bright, flat aqua. I'm usually one for neutrals, but they look super cool and now I want to re-do the rest of my house. Again. The china cabinet was painted in Gothic Grey ( a Renaissance brand chalk paint available on Amazon), and the guts (solid oak) were given a touch up. I wanted to make sure the wood was visible. I didn't touch the knobs, apart from cleaning them, and I'm really happy with that choice. The dark-on-dark look is a winner! The table was from the '70s, and though it had good bones it needed a makeover. The wood was re-stained much darker than I would normally go (again, this was originally a client project) but it looks so pretty against the cream, distressed base that I can live with it for a while. The only thing left to do is stage the china cabinet, stage the dining table (most of the stuff in the pictures will get swapped out), and decorate the rest of the room. I made more off of the sales of my original furniture than the cost of the new pieces and refinishing supplies (bargains, bargains, bargains) so I'll have money left over to go shopping for decor. YAY! I guess that means I didn't decorate my dining room for free, but for profit. Stay tuned for future posts on: 1. How to avoid streaks when using chalk paint 2. Get your wood wet 3. Best places for budget decor 4. How to quickly rejuvenate lackluster wood (without stripping or sanding) 5. Supplies worth the money, and supplies to cheap-out on 6. How to antique furniture 7. More before and afters Thanks for reading, friends! Dated Dining Room Gets a Coastal Makeover
Most of us have pretty fond memories of the dining table we grew up with. Ours was a hand-me-down antique set that belonged to my great grandparents, then my grandparents, and then my parents. The chairs had green vinyl upholstery and nail-head trim. and we beat the crap out of it. By the time I was a teenager the upholstery work my mom did was ripped to shreds and there were a lot of pieces, like arms, missing. I was embarrassed by it then, and now I want to get my hands on it. Oh, how things change. ,
The Brieses purchased a gorgeous, solid oak dining set and china cabinet years ago to host family dinners and make memories. The wood stain was on the darker side, and the same throughout the entire set. It was well loved, well used, but also well cared for. Most of the varnish was worn off but there wasn't any major damage to the wood. They challenged me to turn this giant hunk of oak into something they could love for years to come. Challenge accepted! Yahoo! Here are some pictures so you can see what I mean:
Those were the pictures I received before I saw the set in person. I was excited about the potential of the furniture, but I had no idea how beautiful it was until I saw it in person: the china cabinet was smaller than I thought, which was a good thing; the large, ovular table actually broke down to a perfect round; the chairs were huge, heavy, and sturdy with no wobbling. My challenge would be (1) to highlight the intricate details without allowing the piece to remain dated looking, (2) give the Briese family the coastal vibe they were hoping for, (3) retain the beauty of the wood with a modern twist, (4) stick to the budget we discussed.
The first thing I did was strip the surfaces I wanted to keep natural oak. The top of the table, its leaf, and the buffet section of the china cabinet would remain wood, and the rest would be painted out. I hate covering up gorgeous wood with paint, but this piece was very heavy duty, and incredibly detailed. My thinking was that some paint would help to tone down the '80s details, and would provide a more subtle backdrop to the wood I wanted to showcase. Stripping (get your mind out of the gutter): My favorite product for stripping wood furniture is Citristrip. It's very mild compared to other strippers (hehe), but does a great job removing layers, and layers of gunk. I take a paint brush, especially one that needs a good cleaning (the stripper will remove grime in your brush, too) and VERY liberally brush on the orange goo. Be patient, because this is a bit of a waiting game. If you don't wait long enough the stripper won't have time to penetrate all the layers of crap on top of the wood and you'll just have to keep repeating the process. When I feel like the stripper has done it's job (hehe) I take a metal spatula and scrape off the goo (along with the layers, and layers of gunk) in the direction of the grain. Once I've gotten the bulk of the gunk off I use mineral spirits and a very fine grade (0000) steel wool to clean the wood. It's important to stick with one direction so you're not rubbing everything you've removed from the wood back into it. The steel wool can scratch the wood, so use a gentle hand and remove all of the remaining Citristrip and gunk. If there is any stain/varnish remaining you'll see it and be able to apply another round of Citristrip to those spots. Repeat the steps. Don't freak out. It does take a little bit of 'wax on, wax off' before you get the wood perfectly clean. Be sure to pay attention to any nooks and crannies along the trim. Most of the nasty sh*t piles up in those areas. An old tooth brush, mineral spirits, and steel wool will eventually get all of it out. Staining/ Sanding: Once you've revealed the beauty of the wood you can go ahead and decide what to do with it. The red oak was so gorgeous, I knew I didn't want to cover it up; I only wanted to enhance its natural beauty and hide any imperfections. I chose a very light stain, called weathered oak by Minwax, and applied it. One coat of stain is all you ever need. I use a foam brush, or paint brush to apply, follow the directions on the can, and then use paper towels to wipe off. One good thing about being a mom who rehabs furniture, you ask? I'll tell you. I have a never-ending supply of paper products, including paper towels and baby wipes. Yes, baby wipes. They're awesome for everything. EVERYTHING. Use some 220 or finer grit sand paper after you stain, and in between poly coats to make sure you have a super smooth finish. The first thing people do when they see my furniture rehabs is to rub their hands over the pieces. You don't want them to love the way it looks, and hate the way it feels. DUH. Painting: I repeated the stripping/ cleaning/ staining process for all of the parts that would remain wood, and then got crackin' on the painting portion of my project. I determine what sort of products I'll be using on a case by case basis. I really like Renaissance brand chalk paint for any projects I don't plan to prime, or when I want a more aged effect. For this project I painted the table's base in Gothic Grey by Renaissance, and the china cabinet in Tranquility by Renaissance. I chose to spray paint the inside of the china cabinet because I wanted a very clean look, which is difficult to achieve with a paint brush, especially in detailed areas that you can't see well. The back of the china cabinet was mirrored, so I needed to make sure all of the parts reflected in it would be clean and perfectly painted. I taped off the mirror with painter's tape and garbage bags and got to work spraying, and then hand painted the exterior of the cabinet (after removing all of the hardware, of course). The hardware got sprayed in a matte charcoal grey, also a valspar product, and the chairs were sprayed in Castle Rock (a matte grey/beige spray paint by Rustoleum). I chose to spray paint the chairs because they were incredibly detailed and I wanted a clean look that didn't take three months and very tiny paint brushes to achieve. Spray paint is the sh*t, as long as you know how to use it properly. My next purchase will be a spray gun so I can cut out all of that horrible aerosol and the expense of buying individual cans, but for now they are great! Below are buttons to the products I used for this project. I always try to use the least offensive products I can. Take care of yourself with protective gloves, eye wear, face masks, and/or a space suit. Who gives a sh*t if you look ridiculous as long as your brain parts aren't melting out of your head from use of chemicals. Finishing Touches: Now that my surfaces have been finished, it's time to apply finishing touches. This is always an evolution/ trial and error. Certain things work, and other things don't. Sometimes I have to start over when I've gotten a result I'm not satisfied with. For instance, I distressed the Gothic Grey base and hated it. The base was so beautiful, and intricate, I thought maybe showing some of the wood detail underneath the paint would be a cool touch. The reality was that my gorgeous table turned into a zebra-like monstrosity. So after twenty minutes of distressing, I re-painted the entire base and was content with the result. I sprayed on some clear wax, a few coats with a half an hour or so in between, and that was that. Table done! I did the same with the chairs. I applied a dark wax to the detailed carvings on the chair backs and hated the look. When it dried I repainted them. Oh, well!!! I'd rather a bit of extra work, and a superior result than handing a client a project I don't love, or am not completely proud of. The china cabinet had a way to go before it was completed. I was hoping it would look great with some distressing, and a dark wax over the detailed bits. Once I distressed the piece I got a clear picture of the look I wanted to achieve, and I knew the wax would take 'er the rest of the way. Since the other pieces received a more clean finish, I wanted the china cabinet to have a shabby chic, coastal vibe. We no longer wanted these pieces to look like a dining set purchased together, but cohesive pieces purchased separately to compliment one another. One final spray of Rustoleum brand finishing clear wax, and I think we were there. I hope you had fun reading about my process! Stay tuned for more Before and After posts, and some detailed posts about certain processes I've been practicing (notice how I say practicing?? I'm always a work in progress!!). I welcome your feedback, and please comment with any tips you might have for future rehabs or questions about this project! Thanks ; ) xoxo 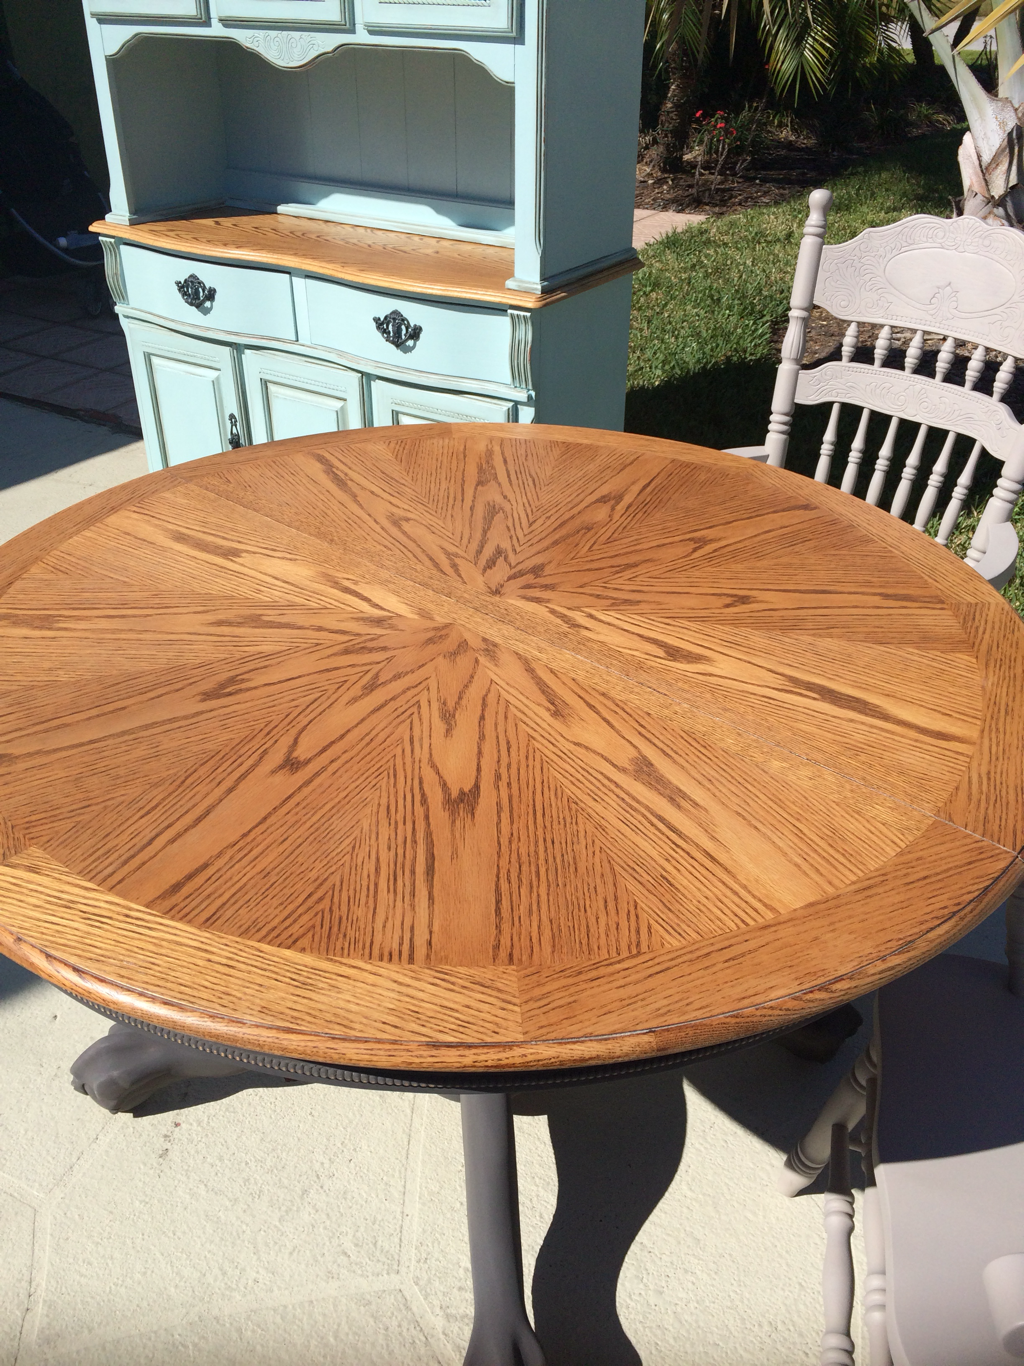
We are a participant in the Amazon Services LLC Associates Program, an affiliate advertising program designed to provide a means for us to earn fees by linking to Amazon.com and affiliated sites.
Though this is my first post, it's bound to get verbally graphic. That was a fair and timely warning, so don't complain if your eyeballs are offended. You had your chance.
My beautiful, sweet one year old cherub of a daughter started pooping mid diaper change the other day and I got to thinking, 'This is a different life than the one I led a couple of years ago'. Different in an obvious sort of way, because a baby I gave life to was literally and figuratively pooping on me; but, also in the sort of way that's not so obvious, because I used that moment for task management. Finding balance as a stay at home mom, and a very new business owner has been challenging. My number one priority is the poop machine. There are moments when I feel guilty because she hasn't been getting the same level of attention throughout the day as she did before I started this crazy endeavor. I usually carve out a couple of hours to work during nap time, and a couple of hours at night after she goes to bed, but every mom knows how that goes. Something always happens, and if a ton of work gets done on Monday, Tuesday is a disaster. *Daylight savings can get stung by a jelly fish and never be peed on. Not ever.* I want to make sure that I don't lose sight of the reason I started Young, Wild and Thrifty in the first place: I didn't want to miss anything. I wanted to find some independence, do something worthwhile and fun, and still be able to stay at home with my bunny (who is a human baby). This little business I've started, basically by accident, has been a huge blessing. I'm busy as hell and tired all of the time, but I'm happy. I'm doing something creative, I'm using power tools, I'm spending more time outside in this gorgeous state, and I'm proud. I'm proud to be doing something that I Iove, and maybe that will inspire my baby girl to grow up believing that we really can follow our dreams. We don't have to settle. You can still shop at Whole Foods if you dumpster dive for restoration projects. Unicorns. I guess I'll probably struggle with feeling like a piece of garbage mom and an amazing DIYer some days, and then a crap business owner and mother-of-the-year others. As long as my kid's happy and sees that her mom is too, blueberry fingernails isn't the worst thing ever. Thanks for reading this stupid test post. Here are some pictures of bunny so you don't feel like you wasted your time. Follow us on Facebook and Instagram! <3 |
AlyssaMama to a beautiful and hysterical toddler. Owner of Young, Wild and Thrifty. Archives
May 2018
Categories |


 RSS Feed
