|
Recently I posted a picture on my Instagram and Facebook page where I was filthy, holding two buckets, and surrounded by awesome pieces of furniture from a weekend "haul". Usually I source all of pieces and we pick them up in one shot. I always find it easier to clean all of them together, patch them together, paint or stain them together, seal them together... you get the idea. This desk rehab I'm going to talk about today was one of the pieces in that sea of furniture!
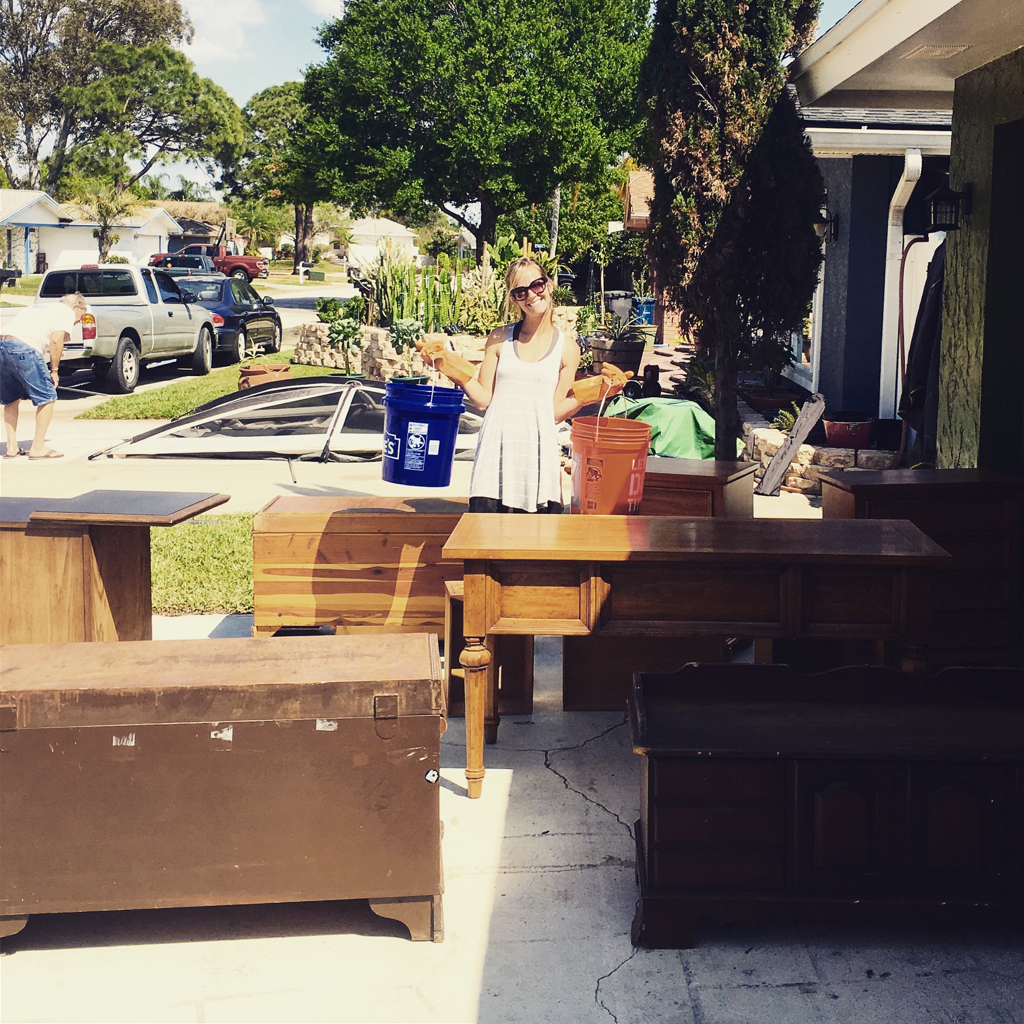
Nate was picking up a bar cart for me from a super sweet woman down the street. She had a couple other pieces for sale and of course when he showed me this desk I fell in love. The turned legs, solid wood construction, dovetail drawers, gorgeous/ heavy duty Thomasville pulls and knobs... *starts to sweat*. This mother f**ker was coming home to mama's garage (that's a great idea for a horror movie).
We are a participant in the Amazon Services LLC Associates Program, an affiliate advertising program designed to provide a means for us to earn fees by linking to Amazon.com and affiliated sites. Steps: 1. Clean/ remove hardware: So the first order of business was to prep the desk. I've discussed my process for cleaning wood in other blogs so I won't go into detail here, but this piece was well kept so it wasn't as traumatizing as some of my other projects. By traumatizing I mean waking up in the middle of the night smacking non-existent-itch-causing dust particles off of your body that you washed three times. I also removed the hardware, putting the screws back in the hardware so I don't lose track of them. 2a. Strip: Not your clothes, your furniture (unless it's really hot out). This is another process I've talked a lot about because I end up doing it a lot (hehe). I apply a very tick layer of Citristrip to the furniture and let it sit for a couple of hours. Keep checking the furniture and any spots that look dry can get a fresh coating. When you're fairly certain the existing stain and varnish is lifted you can scrape with a metal spatula. Remove in the direction of the grain, and then wipe down with mineral spirits to get all of the goop off. This step will help you get a clearer picture of what's next. 2b. When there are a lot of nooks and crannies and turns and F*CK: This gorgeous piece of furniture happened to have a lot of detail. It's very easy to scrape gunk off with a spatula but it takes a lot of patience to get it out of the crevices and rounded surfaces. For these areas I used 0000 steel wool (fine, so as not to scratch the wood) and scrubbed the sh*t out of this sucker. You'll go through about four bags of steel wool, and you better wear thick gloves or you'll look like you were engaged in mortal combat with Edward Scissorhands. Forget going with the grain around here or you'll lose your mind before you're done with the first leg. This part is really important: if you leave old varnish/stain/citristip in the cracks and crevices they won't take stain. I wanted these parts of the furniture to accept more stain (for a rustic look), and the flat surfaces to be lighter. They make a cool tool, like a utility toothbrush, made out of nylon or steel depending on how hard or soft you need the bristles and this thing is very helpful for the hard to reach spots (and does more work than a toothbrush will). 3. Sand: Sometimes you'll need a few rounds of strippin' before you can actually see wood (oh boy). If the Citristip did the job the first time around and there are only a few funky spots I usually take my little mouse sander and gently remove any rough patches, or spots of stain. I like to have a smooth surface to work with before I start staining, and I've never had a problem with a piece not accepting the stain. The mouse sander I use is Black and Decker and rocks because it has a finger sander attachment and can get into little areas where others cannot. It's my spirit sander. Once the piece looks uniform you know you're done with the most annoying parts! 4. Wait: wait a day before you apply conditioner or stain. Your furniture piece will look different when it's totally dry the next day and you'll know if there are little areas you need to touch up. 5a. Stain: I apply a wood conditioner to the whole piece, wipe it off, and then stain right after. It helps the wood absorb the stain more evenly and avoids that horrible blotchy finish you read about on wood forums. I spend some major time at night on ye olde wood forum. I apply stain in small areas at a time. Depending on the wood, the piece will either soak up stain quickly or take forever. I'm not one for "test pieces" (which is why I've ruined my hair many times) but it's a good idea if you're not familiar with wood or how quickly different types absorb. Follow the directions on the can of stain (for this project I used Varathane Briarsmoke). I chose to use Rustoleum Varathane because their stains are usually very thick and I planned on "distressing" my desk using the stain. When wiping the stain off I wiped the desk almost naked with mineral spirits in certain areas and left excess stain on in others. I had never tried this before, and didn't know if it would actually work but I'm so happy with the result. All of the crevices appear darker, and the flat surfaces lighter (as if they were sun damaged). Crazy that I spent all of this time cleaning and stripping the desk only to make it look old again. The Golden Oak era look just wasn't what I wanted. BRIARSMOKE FOR LIFE and stuff. 5b. Hardware: While staining the piece of furniture your hardware can be drying! Paint it, clean it and give it a fresh top coat, or leave it be. For this project I spray painted the original hardware in a bright, light turquoise and then used antiquing dark glaze to give it that cool aged look. Baby wipes come in handy for making sure the glaze wipes off of the raised surfaces completely but stays in the recessed areas. I gave it a quick glossy spray with polyurethane and, viola! 6. Sand: When I've finished staining the piece of furniture, which isn't super duper easy if there are a lot of heavily detailed areas, I let it dry and then give it a light hand sanding with very fine grit sandpaper (220 and above). You always want a nice, smooth finish on a piece you've worked hard on so this is not the time to get lazy. 7. Seal: Brush on that Polyurethane Matte finish! I brush on very thin layers, and sand in between. The number of coats I do is dependent on the use of the piece, and how much I like my client. Just kidding! About the second part anyway. If it's a dining table, coffee table, etc. it needs at least four coats. Anything that is just for show can have the bare minimum. 8. Sand and reattach that hardware: Once the piece is totally dry, and the Poly has had 24 hrs to cure (few hours in between coats but a full day before any hard partying) do a final sand-job and reattach that super shiny, gorgeous hardware! I am so pleased with the way this piece came out, and I think I achieved the weathered, coastal vibe I was hoping for while still showing off the beauty of the wood and original hardware. Thanks for reading, and come back soon ya'll! If you liked this post, you'll love reading about this kitchen makeover and my DIY cedar chest makeover! Don't forget to follow us on Facebook and Instagram <3
1 Comment
5/16/2024 05:40:03 pm
If you need to fight resistant to the hidden dust and airborne debris, the hand held vacuum is usually a suitable choice in your case. Additionally, these kinds of cleaning equipment can also take out and about the dirt through the hard to arrive at edges of your respective kitchen. By making use of a standard vacuum cleanup machine reducing the dust, dust is pretty impossible. Nevertheless, the handheld hoovers come throughout small sizes and they are simple to operate. So, if you need to undergo a rapid cleaning, you must definitely opt for buying your handheld hoovers. Moreover, these kinds of kitchen cleanup tool could fit every single home owner’s finances. Leave a Reply. |
AlyssaMama to a beautiful and hysterical toddler. Owner of Young, Wild and Thrifty. Archives
May 2018
Categories |


 RSS Feed
